Grant of Arms for A&S
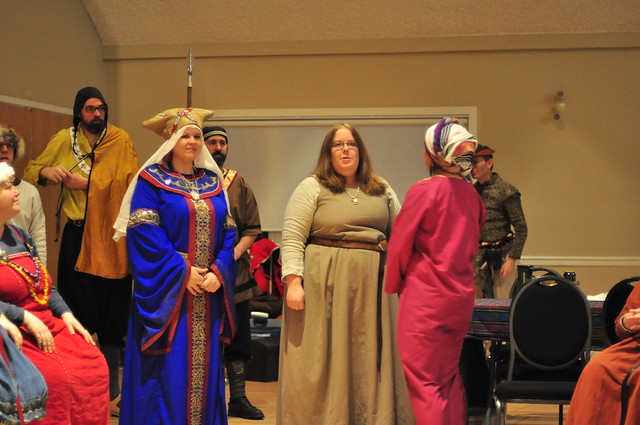
I only realized while writing the post about Twelfth Night that I hadn’t posted about getting a Grant of Arms (an SCA thing) at Montengarde’s Samhain event. (November 7, 2015)
Grant of Arms for A&S
I only realized while writing the post about Twelfth Night that I hadn’t posted about getting a Grant of Arms (an SCA thing) at Montengarde’s Samhain event. (November 7, 2015)
I was so busy at Montengarde’s Twelfth Night (January 23, 2016) that I didn’t even bring my camera, but one of the guests brings his… and posted some photos online that are public viewing, so I thought I’d share them here! (Directly linked from his Flickr account, all copyright his – if he removes them in future, links will be broken.)
During court, I was super-excited to find out that I won the costume contest in the advanced category.
Super-short post today about my February Glam Bag from Ipsy, so I can get back to other posts in my queue.
My Ipsy Glam Bag this month contained:
Baby Blush Stick in Bora Bora Coral

Just a few of the corsets I made prior to 2007 when this photo was taken.
Occasionally on one of the corset-discussion groups I’m a part off, a corset-lover (but not corset-maker) will bemoan that a favourite corset was too-large… and ask what recommendations the group has to take it in to fit.
Generally speaking – the consensus is… don’t. The amount of work that goes into altering a corset is almost as much as making a new corset, so hiring the job out to a seamstress or tailor isn’t going to save you a bunch of money over purchasing a new, correctly fitting corset, and if you’re doing it yourself you’ll have a lot of work on your hands to do it correctly. Also, it’s likely that the newly-fitted corset will NEVER be as strong as the original. There seems to be an ok market for second-hand corsets (if only lightly worn) so generally the group seems to suggest trading or selling a too-big corset rather than trying to alter it.
“To do a GOOD job of it will likely mean completely taking the corset apart. It might not be worth the cost of replacing the corset.
IF it’s a thin corset (not triple/quad layer) a seamstress may be able to ‘take it in’ as a quick-and-dirty method, but it won’t be pretty or nearly as comfortable. Some parts may need replacing anyways, so it too might not be a super-affordable option, especially if the corset wasn’t especially expensive to begin with.
Just a thought. I’ve done it, and would much rather make a new corset than alter an old one when it needs significant changes.”
So I came up with some instructions which I thought I’d share here. Sorry I don’t have photos of all of the stages – but like I said, this is something I have done, but wouldn’t recommend – so I haven’t done it recently to get photos!
If you want to tackle it yourself… be prepared for some sore fingers, a bit of swearing, and for it to take a while.. just plug away a little at a time if you need.

A corset of mine with the round nylon cord for back lacing.
1) Remove the laces (probably obvious, but yeah) Figure out how much you’ll need to take off, and calculate WHERE you need to take it off. You likely will want to take off more from the sides and any curved seams. You won’t be able to take it off centre front or centre back. With a 4″ reduction, that’s 2″ per side, and you won’t want to take that all off one seam, you’ll want to divide that up between the seams.
N.B. Four inches was the reduction amount needed by the person who asked the original question. This is a very significant amount to try to reduce any garment while still keeping the original shape.
1a) If your corset has flossing on the bones…. You’ll need to pick out all of this. If this is a feature your corset has… I wouldn’t recommend doing this alteration. If you choose to anyways – then you’ll also want to re-stitch all the flossings
2) Remove the top binding – you’ll need a stitch-ripper for this, don’t try with just fine scissors. If there’s lace/ruffles/etc at the top attached to the outside of the corset this needs to come off too.
3) Remove the bottom binding – as above. If there is no binding, you’ll need to SUPER carefully un-pick the stitches that hold the bottom layers together. When you are done this will need to be either hand-stitched closed again or bound – if they’ve done it this way you can’t back up steps without taking out the grommets…
4) You MAY be able to re-use the bindings, but probably not…so you’ll need to buy more of this probably to finish your corset when you’re done.
5) At this point all of your layers should be loose except at the centre front (busk) and centre back (grommets.
6) Remove all of the bones. Mark them in some way so you know where they have come out, and where they’ll go back in again. If you need to change the length of the corset as well, these would need to be replaced, but I won’t address this here because it’s another whole step…
7) Turn each side of your corset inside-out so you have access to the seam allowances of your fashion fabric, and either lining or interlining. You’ll need to repeat this twice per panel to be able to access the seam allowances of all three layers (no worry if it’s a two-layer corset… but hopefully it’s a three-layer) Likewise another flip if it’s a four layer.
8) Un-pick the waist stay. This is a ribbon that runs from centre front to centre back and will be sewn to the interlining layer or the lining layer. You will NOT be able to replace this completely, which will reduce the strength of your corset from the original – FYI.

Boning
9) Un-pick all of the boning casings. In some cases these will be separate strips of fabric sewn to seam allowances and/or in the panels. You’ll likely need to remove all of these. In other cases corsetieres fold over the seam allowance to use as bone casings.
10) Like the bindings, you MAY be able to re-use the casings, but no guarantees… you may need to go out and buy material to re-create these. Don’t use ribbon.
11) Mark and sew the new seams on each of your panels, on each layer (fashion fabric, lining, interlining) These will need to be sewn pretty much identical on each layer. This is precision sewing. You may need to undo the previous seam in order to sew the new seam, but in order to not get things mixed up, I recommend doing one at a time, don’t undo all the seams and then try to re-sew all of them… it will get really mixed up. Trim your seam allowances to reduce bulk as needed, but don’t overdo it…
12) Press all of your seam allowances to one side. This might be challenging because you’ll be working with a small garment in the round rather than flat… You’ll likely need a small sleeve ironing board rather than your regular ironing board.
13) Once all the seams have been re-sewn to the new measurement… work backwards.. first re-apply all of the bone casings. This will be VERY difficult because you’re working with a piece of a garment in the round and not on the flat like it was created. Take your time. You may find you need to go top -> middle, middle -> bottom on each side of each bone casing in order to get it into your sewing machine. You may opt to baste these in place by hand first just to make it slightly less fussy…
14) Next you MIGHT want to put in a new waist stay. This will NEVER be as strong as the original, because it isn’t going into the busk or grommets… but you can put it in layering it over the original at centre front and centre back and sew it down along the waistline. Use grosgrain ribbon or wide sturdy high-quality twill-tape. (This is what the original would have been made of.)
15) Ok.. now flip the corset pieces right-side-out and cross your fingers that all of the panels match up identically. If one is larger than another, you’ll need to go back in and edit.
16) Next, replace the binding to the bottom of your corset. You’ll do this by sewing it right-side-to-right side on the front of the corset by machine, and then flip the binding over and stitch it to the back either by hand (which looks much nicer) or by machine (which requires more skill and is much faster). When you get to the area near the busk and the grommets you’ll want to be super-careful you don’t hit anything hard – put on your safety goggles if you use your machine at this point to avoid a broken needle tip ending up in your eye.
17) Next step is to slide in your bones. Now…. Here’s a tricky part. If you have drastically altered the curve of any of your seams because either it needed it.. or you wanted to take some shortcuts and not divide the alteration between the panels… the lengths of your seams will be different than they originally were. Think of a straight line between two places or a detour that goes around the block… it’s longer. You may at this point need to re-measure the place you want to insert your bone and order new bones to the correct size.
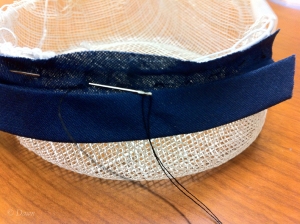
Hand-sewing binding on sinamay – this is the same technique used.
18) Now you can bind the top edge of your corset. Put on your safety goggles… because now you don’t just need to navigate the busk and grommets, but each bone too. You’ll replace the binding the same way as the bottom.
19) If there’s lace or ruffles, you can replace them now too – though I’d recommend doing this by hand versus machine to avoid all of those bones again.
20) Re-lace your corset, and you’re done! A newly fitted corset in 20 long, painful, frustrating steps.
…. Is there any surprise why most folks discourage altering your corset?

Black pleather dress
I’m clearly on a roll – at least for taking photos late at night with poor lighting…
For more ‘everyday’ (ok, not really) sewing, I wanted to test out a simple pattern, since I have had to re-jig my basic dress block. I decided to do my “muslin” in a wearable fabric so that if it all worked out I’d have a new dress out of the equation. I used a black pleather (faux leather) fabric which I really like, and have lots of, to substitute in for the vinyl and leather I’d like to make the same/similar style up in once I perfect the pattern.
The fit isn’t totally perfect – but I didn’t want a super-tight dress either…