
New black apron dress, worn with new brooches, a new key, and a new festoon.
After successfully putting together my red linen apron dress, I wanted to complete my wardrobe with a black one.
In terms of authenticity, I know that black is incredibly hard to dye naturally, and that linen wouldn’t easily take the black dyes that are out there – but still… WANTED a black linen apron dress!

Laying out the pattern for the black linen apron dress, and drawing with chalk additional hem flare

Cutting out the pattern – and the bright pink line where I SHOULD have cut…
I used the same pattern I used for my blue apron dress, but lengthened it a bit, and since there was a bit more fabric, I also widened it at the hem. I SHOULD have trimmed the hem-allowance at the side seam where the bright pink line is above.. but instead I cut it as shown.. and then spent the rest of the dress fussing more than I had to because of that hem allowance…
Seam decoration
A number of the examples I’ve seen from re-creationists have decorated seams. In some of my research I saw that decorative stitches were used on seams both to sew the seam, secure the seam allowance, and to add decoration. I decided to add just a tiny bit of stitching to my seams – something that if I didn’t like wouldn’t be hard to remove, or frustrating to have lost a lot of work.
While at my first SCA A&S afternoon, I didn’t know what to expect, so just brought a few things to work on – this dress was one of them. When I was done doing one part – I spend the rest of my time sitting and chatting and hand-sewing a very simple running stitch along the seam line. I might end up embellishing this further in time – the examples I’ve seen have been far more elaborate than just a running stitch!
Adding the trim
Like the previous two apron dresses I made, I opted to use a narrow band of fabric for the top trim, using it as a reversed facing. I don’t think this is historically accurate, but it’s a good way to deal with the top edge other than just folding it over and sewing it down. I’d like to think it also adds some additional stability for the top of the dress and the support for the straps. It’s also a bit more necessary because I have a slightly shaped top edge – rather than something totally straight that would be easy to fold over. (This is partially due to having a full bust, and not wanting the “neckline” of the dress to stand away from my body! It also means that should I ever get the inclination, I could wear the apron dress by itself – for mundane wear.)
In this case I used a piece of lightweight plain weave silk I had leftover from another project years ago. I sewed it at the top of the dress by machine, and then basted it down on the dress by machine. Then I hand-sewed the facing down, and removed the machine stitching. (I just find machine basting saves my fingers from pokes and makes the garment more transportable if I were to take it somewhere to work on it.)
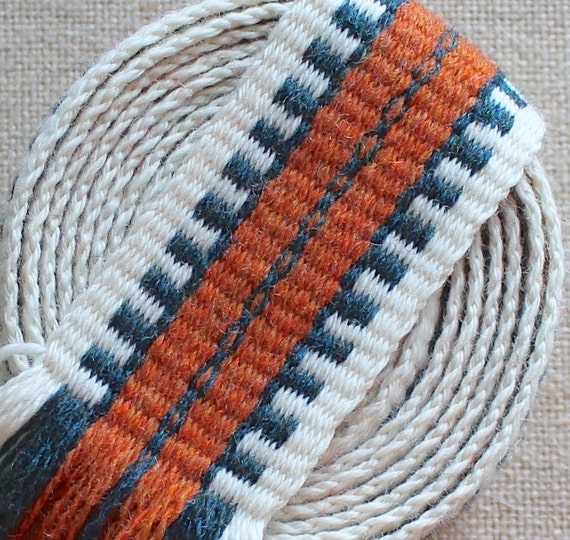
Then, my inkle weaving arrived from my Etsy order!

Trim from Etsy If the image breaks, visit https://www.etsy.com/transaction/218677723
I originally was looking for tablet weaving – tablets have been found in finds dated to the Viking age but I didn’t find any tablet weaving that really appealed to me that was the right length, width, content, and colours… for a price I could afford. I did contact a seller who made tablet weaving I really liked about a custom-order, but she was unavailable at the time. An acquaintance much more knowledgeable and experienced in Viking re-creations recommended inkle weaving as an alternative to tablet weaving, and I really liked the grey, red and gold inkle weaving from “Inkleing” on Etsy. The trim is 100% wool, and although it’s listed as “black and red stripe with gold dots in 100% Shetland wool” the black is really more of a heather dark grey – but it’s super soft and feels just great!
I wanted to give a try to the technique of weaving threads from the inkle woven trim to create a nearly seamless finish.
 copy")
 copy")
 copy")
The first step was sewing most of the trim down, leaving a bit loose on either end. From there the warp threads were pulled into the silk trim and back into the band itself. Then I trimmed the inkle woven trim to length, leaving enough to likewise pull into the weaving. The result is good – it’s not perfect – but for a first try I’m pretty happy. This is under an underarm too, so it won’t be especially visible anyways.
As an aside, I also purchased an additional length of trim from Inkleing: “Inkle trim woven in shades of cream, loden blue and melon in 100% Shetland wool.” as a belt – it’s also soft and easily holds a knot, but so far seems to smooth out nicely when I’m done wearing it.
Trim from Inkleing – if URL breaks, visit https://www.etsy.com/transaction/218677724
I ended up wearing my new apron dress for the first time to a SCA tavern in late October, and then a few days later wore it to work for Hallowe’en. We dress up at my work (well, some of us do) and picking something that was already good-to-go was a lot easier than hunting through my costume closet!
Historical Sew Fortnightly
Challenge #20: Alternative Universe – due Sat 1 November. Create a garment from an alternative universe: fantasy, steampunk, dieselpunk, etc. Your item can be perfectly historically accurate within our own universe as well.
– For this challenge I just finished off the apron-dress I had. I was hoping to do a totally different costume for this challenge, but just ran out of time – maybe I’ll have it done in time for one of the OTHER challenges that it will fall into?
New black apron dress, worn with new brooches, a new key, and a new festoon.
Fabric: 100% multi-purpose 5.3 oz/yd2 linen from Fabric-store.com, plus a scrap of plain silk from a fabric shop specializing in Saris and things.
Pattern: self-drafted
Year: 10th Century, Norse
Notions: thread, embroidery thread (cotton), inkle woven trim from Etsy
How historically accurate is it? The overall shape is pretty good based on existing evidence. I’m guessing on the pattern – with adaptations from the current widely-held notion of what the shapes look like for my own figure and comfort. The apron dress could be wool instead of linen, but I LIKE the linen. Machine stitching on unseen seams, hand-stitching for visible stitching and embellishment. Embroidery thread should be linen instead of cotton, but that’s what I had on hand. I’m pretty happy with the authenticity for the time being.
Hours to complete: 4-5 hours not including embellishment? Not sure.
First worn: October 29 SCA Tavern
Total cost: The linen was $9.10/yard, and I bought 4 yards I think… I think I used about 3 yards for my dress. The silk would have been about $8.00/meter when I bought it, and I used about 30 cm. The trim was about $30.00, and the other notions I had on-hand.

[…] Black linen apron dress – ankle length, silk and inkle-woven trim Needs: brooches for straps, optional belt […]
[…] Black apron dress (linen) […]
[…] I made a hood, and I have already started on another one, so this might be a good candidate. For Nov 2014 I made a Viking Age apron dress, and in Feb 2015 I made a Viking Age underdress. I have a number of […]