Viking Knit

Pair of Viking Knit bracelets - one in single-knit and the other in double-knit

Pair of Viking Knit bracelets – one in single-knit and the other in double-knit

While looking through a continuing education catalog (in the craft section) I was intrigued to take a Viking Knit (also called Trichinopoly Chain, Viking Weave, and Viking Chain) class. The class was over $100 though, and didn’t include all of the materials, so just on a whim I decided to look around online and see if there were other options.

A local bead store is also offering a class, (though they do ask students to purchase materials through them) for about ¼ of the cost, so I’m going to keep my eye on their calendar of events for the next one…

A bit of history

This kind of chain is actually “Viking” (Though the technique wasn’t exclusive to the Vikings, similar wire weaving has been found in Roman, Greek, and Byzantine sites as far back as the 1st century BCE.) as archaeological examples have been found in sites in Scandinavia and lands visited (raided, settled.. etc) by the Vikings and have been dated back to the 8th through 10th century.  The Knit Smithy writes that ‘Viking Knit’ was used to make jewelry, trim clothing, and make other decorative objects. It was just one of many techniques used by the Vikings though, along with looped and forged wire chains and twisted wire (like that used to make neck or arm torques).  The ‘stitch’ is similar to nalbinding – the viking knitting technique used for articles of clothing.

Jen Haley has also shared her research (which looks like something for the SCA) along with written (no photos) directions on how to create Viking Knit items. There is also a significant document on ISSUU by Lora-Lyne Stevens which… because of the formatting, I found really, really hard to read – and hence didn’t read all of it.  😦


Pink double-knit Viking Knit bracelet

Pink double-knit Viking Knit bracelet

Online resources (for crafting)

In the meantime, I took a look online for an idea of how to make Viking Knit. The best tutorial I found so far is on the Wildflower Designs blog: http://wildflowerdesignsnz.blogspot.ca/2011/10/viking-knit-tutorial.html

Additionally there is a good tutorial on ArtFire: http://www.artfire.com/ext/shop/blog_post/EntwinedVines/6437/how_to_make_viking_knit_pt_1  similar directions are on Fine Art by Rocio, http://www.fineartbyrocio.com/vikingknitdirections.html and Bracelets By Joy also has a three-part blog post about how to start, add beads while you ‘knit’ and finish off the chain (not including actual findings). The company that makes a special tool for Viking Knit (which isn’t necessary, but skips a step in the process by the looks of things) has posted a video on YouTube with fairly good visuals for those who learn better with a video than by pictures… http://youtu.be/Lr7tds7DDmc


Apparently the tools are pretty simple – a dowel, wire, tape, a nail, awl, or small crochet hook, a drawing board (a board with a bunch of various sized holes drilled in it), and then finishing items like caps, beads, etc for the finished piece.

Gold single-knit Viking Knit bracelet

Gold single-knit Viking Knit bracelet

Stay tuned…

Well, I finally got around to taking the class! In the next few days I’ll have some photos to share about the class and the project I made in the class!

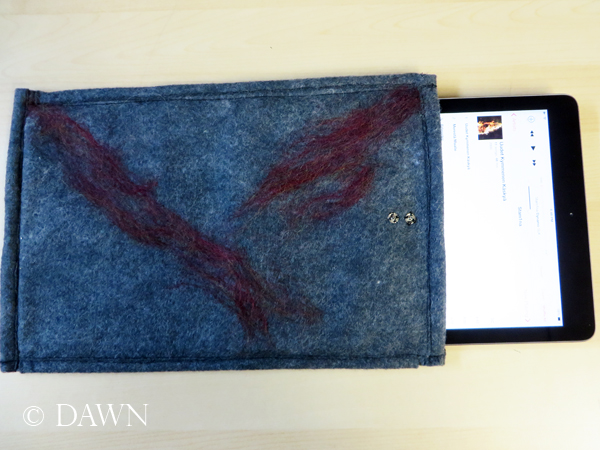
Hand-made felted iPad Sleeve


iPad and felt sleeve

iPad and felt sleeve (What’s that on the screen? Why, my sewing music! Metal from Finland – Stam1na!)

Just before my recent trip to Hawaii I bought myself an iPad, largely because I wanted something I could type on with relative ease, but that was lighter than my laptop for travel.

With a new iPad, of course I needed a case to protect and carry it easily, and after spending hours shopping for one for my mum, I knew exactly what I liked – and what I didn’t. Unfortunately the one she had picked up was no longer in store, but I could still order it online. Worse still, I didn’t really have enough time to order it before I left on my trip.

iPad and felt sleeve

iPad and felt sleeve

So, although I knew I’d end up buying the case I really liked, I needed something in-between, so in a morning before heading off to an appointment, I whipped up this simple and easy felt sleeve. Of course, I had to personalize it just a little, so chose to quickly do some needle felting with some burgundy roving I had on the front.


Want to make one of your own? Here are the steps:

 Cut your pieces

  1. Cut two pieces of wool felt to the size and shape of the device – plus a little extra to go around the width and for seam allowances. This can get trimmed down later. I used one piece of grey and one piece of burgundy felt.
  2. Cut a number of narrow strips of wool felt – these will be the binding for the sleeve as well as the straps. I cut mine to an inch wide.

Embellish

Close-up of the felting

Close-up of the felting

  1. (optional) Needle felt any design or be totally random on one side of one of the pieces of felt. Alternately you could applique, stitch, embroider, etc…

Sew

  1. Use a straight stitch to sew the two large pieces of felt together, wrong sides together, along three sides (in my case I stitched along the two long sides and one short side, but this would really be your personal choice. Most sleeves seem to be constructed this way though.)
  2. Slide your iPad or device in.
  3. Once your iPad or device is in, you’ll be able to see the fit. You might need to tighten it up a bit by sewing along one of the side seams. The fit should be relatively snug, but you should be able to slide the device in and out.
  4. Trim all of the seam allowances. Since I had cut my binding strips to one inch wide, I trimmed my seam allowances to less than half an inch.

Make your strap & continue

  1. Measure the height (from the sewn end to the open end) of your sleeve, an cut two strips to that measurement plus 3-4 inches. This will be your strap and closure. Sew these two together along the long ends, then fold over one edge approximately 1 inch, and top stitch in place. This is where your closure will go.
  2. Position the raw (not top-stitched) edge of your strap to the bottom of your sleeve, on the back of your sleeve, and stitch in place. Cut a slightly wider narrow strip (the extra width will be needed to accommodate the strap bulk as well) and bind this seam covering the raw edge of the strap.
  3. Bind the top edge of the front of your sleeve.
  4. Bind the top edge of the back of your sleeve, and stitch the strap into place at the top of the binding while attaching the binding. A short amount of the strap should go past the top of the sleeve to create the closure.
  5. Bind the two sides of your sleeve using the narrow strips of wool felt.

Fix the closure

  1. Hand-stitch snaps onto the top stitched edge of your strap. Alternately you can use Velcro. (I hate Velcro though, and use it as infrequently as possible)
  2. Fold over the strap and mark where the receiving ends of the snaps need to be stitched. Back the front of the case with a small piece of felt inside the case, and hand-stitch the other sides of the snaps in place.
  3. Done!
Back side of the felt sleeve (and of my iPad!)

Back side of the felt sleeve (and of my iPad!)


Sunset (Acrylic painting)

Sunset during my Alaska cruise

Sunset during my Alaska cruise

I haven’t shared my painting in a while, but I thought I’d post one I finished off a while ago… that I’m actually not too happy with. I don’t know what I don’t like about it – just that it doesn’t do it for me. I’ve decided to live with it for a while before doing anything else with it though. The water isn’t right to me, the clouds aren’t right… it just overall doesn’t work for me… but I think I’m too tired of it to continue working on it right now.


Acrylic/mixed media painting of a sunset

Acrylic/mixed media painting of a sunset

It started out as a completely different painting… that I totally messed up on. I ended up covering the canvas entirely with a thick medium, which created lines and ridges that I thought was interesting. From there I covered the surface in gold leaf, and then painted on top of that with a variety of acrylics and acrylic glazes.


The painting was vaguely inspired by a photo I took from my trip to Alaska.

Being white – blond (and keeping my hair healthy)

Shampoo and conditioners

Shampoo and conditioners

Since going super-blond/white blond, I have had a few friends and acquaintances ask how I was able to bleach my hair to this degree, while still retaining the length and relative health of my hair. (As in.. it doesn’t feel like straw all the time.) Rather than try to remember all of the products I’ve used, I figured I’d make up a short post as a follow up to my Purposefully White Hair post a while back. (And yep.. other than semi-regular trims, I haven’t had to cut my hair at all since bleaching the heck out of it!)

Shampoo and conditioner

I use two different kinds of shampoo & conditioner – one is for toning (keeping the brassy yellows out of my hair and keeping it white-blond) and the other is for condition/texture – basically to keep it looking and feeling healthy (even if it isn’t!)

  • Joico Colour Endure Violet Shampoo – this is a dark purple sulfate-free shampoo for toning blond or grey hair. The staff clerk who advised me said that it’s a bit drying though… I haven’t had a problem with it – but I always use conditioner too. I picked this up at Chatters.
  • Shimmer Lights Shampoo & Conditioner – these are products also intended for “blonde & silver” hair. They are both purple as well, to tone the hair and get rid of the brassiness. I think they’re good, but I don’t like the way they smell at all; they smell sort of earthy or chalky. I picked these up at Sally’s Beauty Supply.
  • Ion Smooth Solutions Keratin Smoothing Shampoo, Conditioner, and Masque – these are protein products, intended to repair and smooth hair. I use the masque maybe once every two-three weeks, leaving it on for 5 minutes or so. I bought these at Sally’s Beauty Supply.

All of the toning shampoos and conditioners don’t actually mean I get to stop toning my hair though with my own home-made dye+conditioner concoction to actually keep it WHITE (or pale lavender). If I don’t do that extra treatment, my hair goes back to being just super-light blond instead.

Leave-in treatments I use

Leave-in treatments I use

Leave-in treatments

  • Joico K-Pak Colour Therapy Restorative Styling Oil – I love this stuff a hundred times more than the Moroccan Oil or Coconut Oil that I was using before I picked this stuff up… it seems to leave my hair soft and manageable, but much less oily than the other products. It also smells really good! I picked up my supply (three containers, one for my room, one for my bathroom, and one for traveling) at Wal-Mart.
  • Joico K-Pak Restorative Liquid Reconstructor – this is a leave-in spray-on product… and honestly – I don’t love it nearly as much as the next one. I got it at Wal-Mart as well, but it seemed kind of pricy.
  • Live Clean Exotic Nectar Argan Oil leave-in conditioner spray – this leave-in spray is much nicer than the K-Pak for my hair, and I use it all the time to smooth my hair. It smells good too. (I’ve also duped it by mixing coconut oil, water, and lavender essential oil in a leftover container and using that too, which was actually almost as nice, and would have been cheaper too….)

What are your tips and tricks?

So.. if you’re thinking of going white-blond, super blond, white, or silver… maybe some of these products will help! Share some of your must-have products or techniques in the comments below!


Red Deer Sewers – raid your stash!

April 9 fabric finds (close up)

April 9 fabric finds (close up) from the Calgary sale

If you’re in Red Deer, you aren’t being missed out on the fabric stash/destash madness! The GrammaLink-Africa group in Red Deer host a fabric sale as well, with proceeds going to the Stephen Lewis Foundation.

GrammaLink-Africa Fabulous Fabric Sale – Red Deer

In 2013 the sale was held on April 13 at the Gaetz United Church (4758 5oth Street, Red Deer) and for 2014 you can build up your stash of fabric, yarn, and quilting supplies on April 12, 2014 from 9:00 a.m. – 2:00 p.m. at the Gaetz United Church (4758 5oth Street, Red Deer)

Get more information about the event here: http://www.grandmotherscampaign.org/ai1ec_event/grammalink-africa-fabulous-fabric-sale?instance_id=910

Hat Grannies for Africa Fabric Sale – Medicine Hat

I don’t think that I have any readers in Medicine Hat… yet… but I JUST found out that there is also an annual sale in your community too.  Unfortunately for 2014 I’m a bit too late – the sale was on March 15th, 2014. It was held at St John’s Presbyterian Church (504 2 Street Southeast) from 10:00 a.m. – 2:00 p.m. Mark your calendars for next year though! Or just come visit us up in Calgary! (Read more about the event which has now passed here: http://www.grandmotherscampaign.org/ai1ec_event/hat-grannies-for-africa-fabric-sale?instance_id=940 and then bookmark the site for next year!)

Guelph’s Fabulous Fibre and Fabric Frenzy

While on the Grandmother’s Campaign site I also saw that Guelph, Ontario also has a fabric sale like this! This one took place on March 22nd, 2014 from 10:00 a.m. – 3:00 p.m. Now, Guelph is a bit far for ME to go.. but perhaps it’s close enough for one of my readers to participate, and send back word about the sale? Just for reference, the sale took place at the Dublin Street United Church (68 Suffolk Street West).

Stay tuned!

Keep following the Fabric Sale tag for lots of posts about this cool sale – and others you might want to participate in!