A recently-finished cute tote
Ages ago I posted about some fabric I picked up and a tote I’d seen in Essentials in Invermere, and I wanted to show that not ALL of my fabric goes straight into ‘the stash’.. some of it actually DOES get made up!
 copy")
The original
Inspiration
First off I really liked the use of pattern and colour in the original tote I’d seen – I also liked the vaguely vintage feel to the curved corners too. I remembered a purse/bag designer that I had really liked some of the patterns of – Lazy Girl Designs as well. I really like the functionality of the Margo bag, but the two ideas seem really different. The original is actually a lot more like an Amy Butler pattern I later realized.

Lazy Girl’s Margo handbag
So, I looked around some more for design inspiration… Basically my criteria:
- A zippered tote that doesn’t need to be zippered to retain it’s shape
- Outside pockets for fast-store things like water bottles or pens that I wouldn’t worry about if I lost them (either due to pick pockets or having the bag turned upside-down)
- Inside zippered pockets for hidden important things
- Inside key clip
- Inside patch-type pockets to keep things organized
- Sturdy, fairly wide handles, long enough to hook over my shoulder, but short enough to generally just be held in my hand
- Big enough to carry my lunch, paper work, tea, etc to work – plus my purse in a pinch.
- Small enough so I don’t over-load it and hurt myself carrying it, instead of shifting things into a backpack!
- Potentially washable. (Not as big of a deal, but a nice-to-have.)
I selected this photo of the Margo purse for inspiration because the person who made it added the zipper, and if you follow the links – some cool interior pockets for organization – a lot of the other photos of the Margo don’t really show the zipper option.

Studio Kat’s Quattro handbag
In my design-inspiration search, I also found the Quattro Pattern from Studio Kat designs – which I also really liked (the style at least.. the colours in this example are a bit much for my muted tastes!) This one doesn’t zip closed though, but I thought between the three examples, I could design something that would work for me. (Lots of other inspiration photos on my Pinterest board – created after I started this project.)
Process
I would love to say that I totally thought this one through, drafted patterns and all of the rest for the bag before I made it up – but no. I just opened Adobe Illustrator on my laptop, and started drawing out shapes. I don’t have a printer upstairs (and the basement was still renovation-hell) so I went straight to fabric for this one. I had the fabrics I picked up at Essentials, along with a few others from Freckles, and then it was just a matter of figuring out which ones I really wanted to use for this project!
Fabric
I had 1m of the fashion fabric, 1m of the pocket fabric, and .5m of the top band fabric.
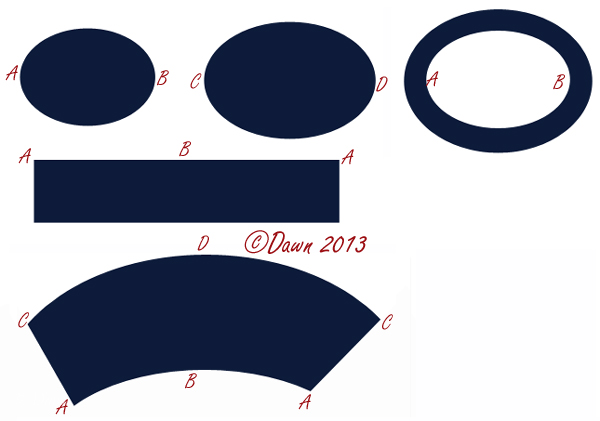
Cutting
So, if you want to make one too, here’s what I did.
Fashion fabric & lining
I used the same fabric for both – a pink and tan stripe.
- Cut 4 rectangles as tall as the bag (plus the base) and twice as wide, PLUS seam allowances on all sides.
- Interface the fashion fabric.
- Sew the side seams of the lining and the fashion fabric.
- I added a twill tape reinforcement along the seams, and top stitched the seams to hold the twill tape in place.
Outer pocket & lining
I used the great corset & dressmaking tan fabric for both.
- Cut 4 rectangles as tall and just slightly wider than the above rectangles, plus seam allowance on all sides.
- Cut the bottom of the purse pockets to equal the base fabric (for the base of the bag), cut out the curves and taper the side seams.
- Sew the side seams together for the pocket and the pocket lining. (I actually did this later, and should have done it at this stage…)
 copy")
the trim on the “curve” after being top stitched
Curve trim
I used some remaining striped fabric for this. This is totally optional, and you could also do it as bias trim if you wanted.
- Cut some strips of bias from the fabric, sew them together, fold, and stitch with the raw edges together to the curves of just the outer pocket fabric, within the seam allowance.
- Sew the pockets together, right sides together, along the curves.
- You don’t need to stitch the top or bottom – they’ll be handled later.
- Turn the pocket right-side-out, and top stitch the curves.
Top band
I used a darker pink fabric for this.
- Cut a long rectangle that is twice the height of the finished band, twice as long as the top of the purse, plus seam allowances.
- Interface
- Sew the side-seam
Shoulder straps
I used the striped fabric for this.
- From some of the remaining fashion fabric, cut two very long rectangles to make the straps. Length and width your choice.
- Sew tubes with the fabric, turn inside out, press flat and pull through wide twill tape.
- Top stitch straps to hold twill tape in place.
 copy")
The patch pocket on the fashion fabric. I matched the stripes so it would blend in nicely, but left the fabric label (selvage) on because I thought it would be cute. The way the pocket is aligned, only the top right hand corner will show – I’ll only see the label if I go looking for it.
Outside pen-pocket
I used some left-over striped fabric for this.
- Construct a pocket by folding fabric in half, and sewing and turning. Press.
- Lay the outer pocket on top of the fashion fabric (the interfaced one) with the side seams of the fashion fabric moved to the middle (so that there wont’ actually be side seams). Mark pocket placement.
- Top-stitch pocket in place.
 copy")
Trimming off the triangle on the bottom of the bag
Bag base
- Layer the outer pocket around the fashion fabric, with the seams of the fashion fabric in the middle of the pocket (so they won’t be seen).
- Turn the bag (as one unit) inside-out.
- Sew the bottom seam.
- You could theoretically just leave it at this point, but I like rectangular base so the bag will stand up a bit on it’s own. To do so, turn one side of the bag so that the side seam lines up with the bottom seam, and sew across – basically sewing a triangle into the bottom of the bag. Trim this off, and repeat for the other side.
 copy")
The outside of the bottom of the bag
Inner pockets
Since I hate wasting fabric, I used the fabric left over from the curved cut outs. You can make basic patch pockets however you want, but here’s what I did.
- Along the straight edges of the 8 curved pieces, sew them together in four pairs, sewing all the way down on two, and leaving a hole in the middle of the other two. Press seam allowances open.
- Sew right sides together, turn through the hole, press.
- Hand-stitch the hole closed. If you aren’t’ fussy about how this looks, you can also just top-stitch it closed.
 copy")
Curved pockets. The example on the right has a topstitched opening, while the example on the left is hand stitched. (Just to show you options)
Attaching the inner pockets
For this I layered them to get a better use of space within the bag. Plus I think it’s cute. Mostly I did it because it’s cute.
- Just like the outside pen pocket, these were just sewn on patch-pocket style. Put the one on top FIRST, and watch out that where the second one sits the stitching wont interfere with the pocket below it.
 copy")
curved patch pockets
Zippered inner pocket
- These were assembled first, the zipper ends were covered with self-fabric, and then they were sewn on patch-pocket style too.
 copy")
two zippered pockets with the zippers mirroring one another
Zipper gusset
I cut the gusset extra-long so that the tails can sit inside the bag for extra security.
I cut out four of a long rectangle with a small flange on the rectangle. The ‘tails’ are finished on all edges, while the flange will sit inside the seam allowance to insert the gusset into the bag.
 copy")
Zipper Gusset
Key clip
I made two key clips using spring retract clips and a narrow turned and stitched band of the fabric, inserted between the top band and the top of the purse under the zipper gusset.
Finishing steps
I ended up pausing on this bag, and actually kind of forgot about it. Over the winter holiday break I got inspired to pick up a few of my older projects (like the quilts I showed off not too long ago) and finish them off. I put the zipper gusset to the top of the bag, along with the straps, and topped off the bag with the top band. This was carefully stitched down, and then I also did a line of top-stitching to secure the straps to the top of the bag.
Complete!

That cute little side pen-pocket in action. (It’s big enough for more than a pen of course!)
So here’s the completed version! It’s super cute, and very girly. It fits all of my criteria too – I can use the big outer pockets for quick things, leaving the bag zipped closed, or open up the zipper and access all of the inside pockets too.

Pink tote ready to go!