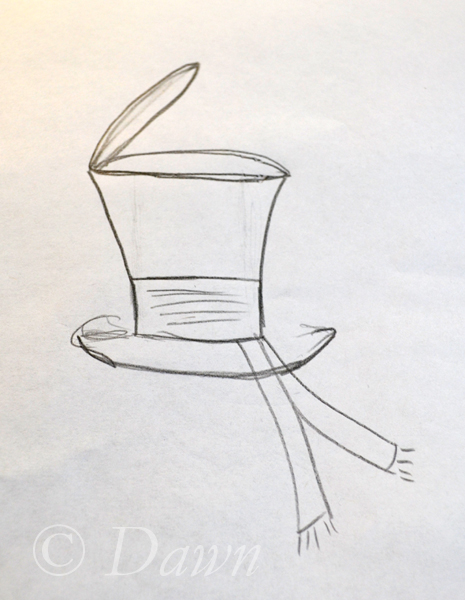
Quick concept sketch for my twisted mad hatter’s hat.
Inspired by the figures of polymer clay artist Nicole West, I started off with this hat with a concept sketch. Honestly, the sketch wasn’t much at all – just something to keep me on track. I wanted to do a top-hat, but without a proper block this wouldn’t really work, so instead I would go with a Wellington design – similar to the classic Mad Hatter’s hat.
The Wellington is one of several kinds of top hats, but lacks the hourglass shape – instead it has a “V” shape, having a larger tip than the headband. You might remember the miniature Wellington I made a while back – before I took the millinery class.
The pattern
With the open tip, I knew that this hat would lack some integrity, plus if I wanted to have something sitting inside the hat (I was thinking of either making my own March Hare or White Rabbit, or perhaps buying one of the Cheshire Cats from the Disney store) I would need to have it sit on something other than my head. With this in mind, I decided to have an internal Pillbox hat inside the Wellington. This would give the hat the structure it would need, would let it sit properly on my head, and would give the critter inside somewhere to sit.
This means I’d need:
- A Pillbox band
- A Pillbox tip
- A Wellington band
- A Wellington tip
- A Wellington brim
I’ve sketched up a quick illustration kind of what the pattern pieces look like. This is so TOTALLY not to scale, so if you want to make your own, you’ll need to draft the pattern yourself, based on your measurements, the desired height of your hat, and the desired width of the top of your Wellington, along with the width of your brim.
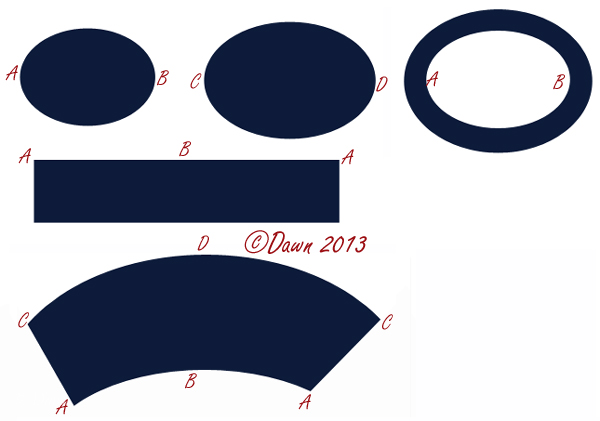
Open Tip Wellington hat pattern
In the above illustration, the first oval is the Pillbox tip. The second is the Wellington tip, and the open oval is the brim of the Wellington. The long rectangle is the Pillbox band, while the curved shape represents the band for the Wellington.
The letters indicate which areas are going to match up with others, so, A-B is half the head size, C-D is half the size of the Wellington tip. The Pillbox and Wellington band heights are your choice – I originally made the pattern for the Wellington band about 4″ taller, tried on the paper pattern, and then trimmed it down.
Stay tuned, soon I’ll show you some of the construction details for this hat. Keep following the Mad Hatter`s Tea Party category for all of the upcoming posts!
June 2014 update
This post has been getting a LOT of attention from my friends over at Pinterest – but I’ve noticed a few people have pinned the pattern as a top-hat pattern… Just to clarify, if you use the bottom curved piece, plus the middle large oval, plus the brim, you’ll get a Wellington-style top hat – if you want one with straight sides, you’ll use the straight band, smaller oval tip, and the same brim. If you use the pattern – please post a comment and share your results!

Good Evening! I like the variety of information on sewing.
I wanted to leave a story concerning a Mad Hatter’s Hat I made for my puppet from Alice in Wonderland and wondered if you every have the experience of another’s critique? My puppet’s hat was made from a turquoise felt square, not a copy from what I have seen on the Internet. It turned out to go with the patterned suit coat. My friend said it did not make sense of making such a hat with such a color since it did not match the Mad Hatter by English period.
The Puppet turned out very colorful and looked zany as any Mad Hatter of Lewis Carroll’s artist might create. I embroidered his name on the back of the Jacket. Lots of fun being creative… You have an excellent web page. Makes me inspired. Mrs. ATK
What fun!